EC2 on AWS
Introduction
The purpose of this page is to go into some detail about the provisioning and use of AWS EC2 (Elastic Cloud Compute) virtual servers. What is an EC2 really? It is simply a computer available for you to use on the cloud. You pay for it by the hour, typically a few cents per hour. If you get a really powerful machine you can pay as much as $15 per hour so we suggest you do not do that, to start with. Also please be aware that you can Stop an EC2 instance and not pay the hourly rate without losing its contents. To get them back just Start the instance again.
Links
- EC2 Instance pricing
- AWS Calculator
- Elastic Block Storage
- Elastic File System
- AWS Security Groups
- AWS training fundamentals
- AWS tagging strategies
Warnings
*** There are three really important things to understand before you start using EC2 instances:
- Never place your access keys in a public repository such as GitHub.
- Never allocate EC2 resources and leave them running idle. This will cost you money. Learn to shut them down. Even stopped EC2 instances with attached EBS volumes will cost you money!
- Learn to tag your resources to help cost management. ***
Informal introduction
An EC2 (Elastic Cloud Compute) instance is a computer; or you may prefer the term ‘virtual server’. It runs the Linux or Windows operating system just like a box under your desk might. However: If you need to increase your computing capacity or expand your storage: There are many many such EC2 instances available at a moment’s notice.
Please refer to our read our Cloud Core drop-down for more on how cloud computing may be suitable for your project,
Details and terminology
Amazon Web Services (AWS) EC2 instances come with a host of features and terminlogy. Briefly:
- AMIs
- Elastic Block Storage (EBS)
- Snapshots of EBS volumes
- EC2 Resources
- Elastic File System (EFS)
- Elastic IPs
- Access keys and ‘Key Pairs’
- S3 storage and access
Setting up an EC2 Instance
The ‘compute’ part of the cloud begins with Virtual Machines that are called Elastic Cloud Compute = ECC = EC2 instances. To get started with EC2 instances you would log on to the AWS console, click on the EC2 icon and follow the buttons to create a new instance; which takes a few minutes. And then you can log in to that machine and use it like any other computer. It has an operating system that you choose, it has some amount of computing power that you choose, it has some amount of RAM that you choose and it has very little disk space.
A short digression on logging in
Before going any further let’s log on to the instance. Note its ip address in the AWS console in the Instances table. Let’s suppose this is 123.124.125.126 and that you chose the AWS Linux operating system. You have also downloaded the keypair file that we will call kp.pem. If you are on Windows you use PuTTYGen to convert this to kp.ppk but let’s assume you are on a Linux machine or a Mac which has the ssh command built in. (Also you can install the bash shell on Windows.)
Go to the file location of your .pem keypair file and type
% chmod 400 kp.pem
% ssh ec2-user@123.124.125.126 -i kp.pem
It may ask whether you wish to continue to connect. Answer ‘yes’. If everything has gone according to plan you should see a little banner and a login prompt. This is the command prompt on your EC2 instance on AWS. Welcome to the cloud. Depending on your instance type you may have more than one attached disk volume; but at this point we will back up our narrative to try and be a bit more methodical.
To continue with setting up your EC2 instance
This is the big Aha: You also want to attach some disk space in the process as well. The generic term for disk space is a disk volume. You can attach these volumes (more than one is fine) in the spin-up process or you can attach them later. This is Elastic Block Storage (EBS). A single EBS volume can be up to 16 Terabytes.
Let’s assume EBS is where you’ll keep your data; and so to safely make a back-up copy of that EBS volume you can periodically take snapshots of it. The snapshots bundle up all the stuff in the volume and put that (like a big zip file) in S3 storage. That storage is completely separate from the EC2 instance and its attached EBS volumes. You can also bundle up an image of the entire EC2 instance into storage. This is a snapshot combined with some additional instructions on setting up the instance; and together these comprise an AMI for Amazon Machine Image. So there are two levels of granularity in backing up your work: Snapshots and AMIs.
Now how much does this cost? The EBS costs ten cents per GB-month. Storage costs three cents per GB-month; so if you have a lot of data this is considerable cost savings, putting your EC2 instance in storage by means of an AMI; or putting your disk volume in storage by means of a snapshot. The EC2 instance itself (not considering the cost of the EBS) will vary with which machine you chose. A cheap machine is free (T2.micro). A basic, simple low-power machine will cost three cents per hour. A fairly powerful machine will cost perhaps 40 cents per hour. You can also rent super-powerful machines for several dollars per hour. Since that adds up it is important to know that you can turn these machines off (without losing your data) so that you are not paying for them when you are not using them.
What this page is / isn’t
Now this document is in preparation; so it does not cover everything in this topic. For example it does not cover how to save money by using the Spot Market and it does not cover turning EC2 instances on and off and setting Alarms to inform you when they are possibly doing something expensive. We’ll build all of this into these documentation pages; but the main point of this page at the moment is Resources: The short list of items that you tend to build and associate with EC2 instances. This includes AMIs, Snapshots, Key Pairs, and Elastic IPs.
Tagging
Tagging helps to manage and organize your AWS resources. This page contains the long spiel on tagging strategies. A few things to note: tagging will help with cost allocation. A good practice is to always set the following tags when spinning up a new EC2 instance:
- name: Name of your resource (e.g. cloudmavencompute)
- owner: Owner of the resource or who provisioned the resource
- project: For billing purposes or which project the resource belongs to
- confidentiality: For data security reasons if necessary
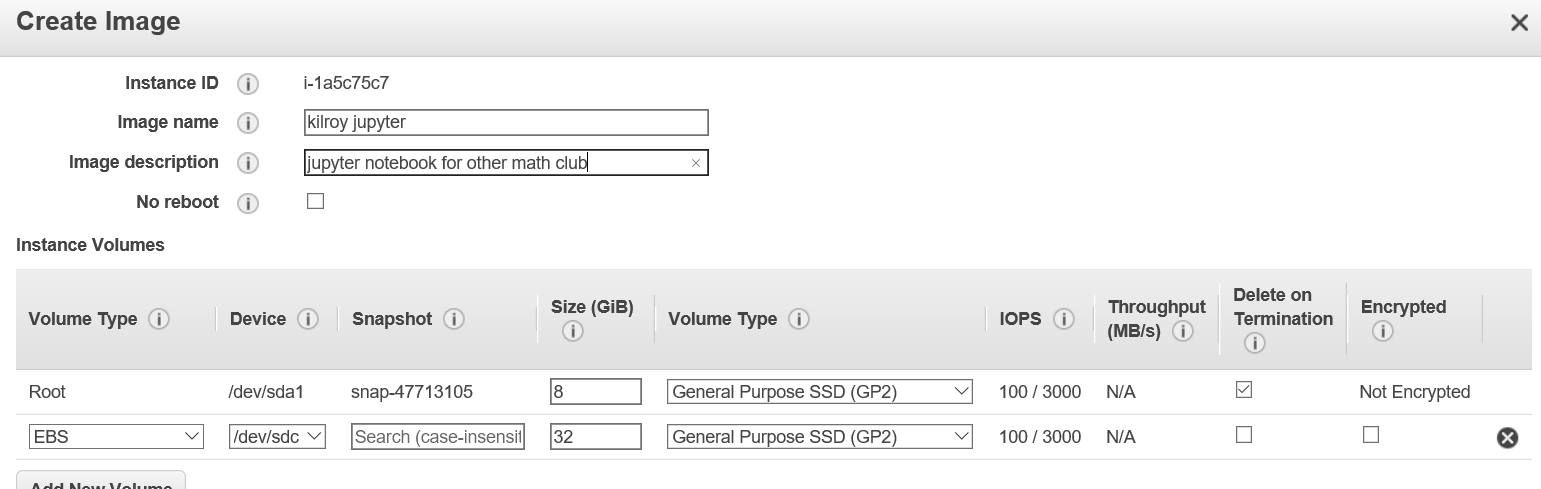
Making an AMI
An EC2 instance: We take as a given. (Although we don’t have down “Encrypted” but let’s just flag that with kilroy. Notice I can create an AMI quite easily using the menu. Here is the configuration page:
Resource Overview
Returning to the EC2 Resource summary: Let’s take a look at what’s what here term by term:
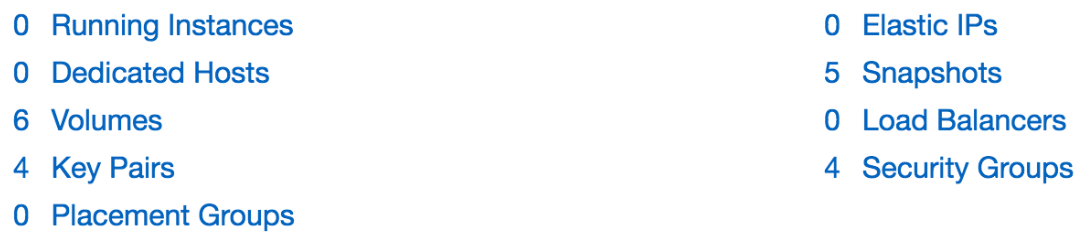
In this region I’m not (apparently) running any instances.
Elastic IP
An Elastic IP is a convenient persistent ip address associated with my account (and with a particular machine unless that machine gets blown away). It is said to be ‘publicly routable’: It is visible/findable on the internet.
AWS will hand us some number of these on demand for very little money. If we do not request this, however, then the default is a temporary public ip address that is only good as long as the instance is up and running. Shut it down and that ip evaporates.
An Elastic IP is persistent on my account and could even be detached and re-attached to something else. This is like having a piece of public plumbing at my dispoal to a resource that I want to share for example. This ip stuff is distinct from a DNS entry. The latter is a person-friendly string associated with an ip address (free or maybe for a nominal fee).
Dedicated Host
A Dedicated Host is a physical computer which permits only me (my AWS account) to be connected. It does not thread in other virtual operating systems or other accounts. This is an important concept in HIPAA compliance.
Snapshot
A Snapshot is always drawn from, i.e. is an image of some Elastic Block Storage (EBS). An 8GB Snapshot is quite likely the root volume of an AWS Linux EC2 instance. However if you attach more EBS – like say 2TB – to that instance you can make a separate larger Snapshot.
AMI
An AMI is a Snapshot together with some instructions for standing up an EC2 instance. Hence: When you create an AMI part of that process is a Snapshot or Snapshots of all the EBS volumes associated with that instance.
Snapshot to AMI Conversion in Linux
You can “upgrade” a Snapshot to an AMI in Linux but it is more complicated for Windows. And this is a little bit vague: Do we mean that the snapshot is of the Root volume or an attached volume? The rebuilt AMI – in the case where the original AMI instructions are unavailable – will be built out rather generically. This is one of these digressions that can drive one crazy so let’s leave it there for now.
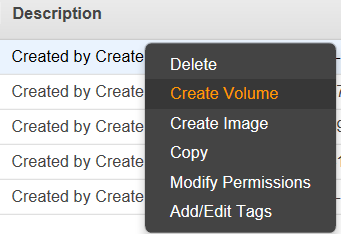
Understanding a Snapshot listing
When you look at your Snapshot listing:

CreateImage is a facility for building an AMI. Fine.
- …is an instance ID.
- …is an AMI ID.
Snapshot Archaeology
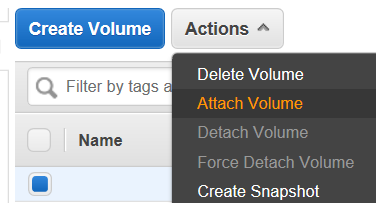
Suppose you have an old Snapshot and you are not sure what is on it; and if nothing you might want to delete it. Now can you look at it? If the associated AMI is gone you can always create a Volume from the Snapshot, Attach the Volume to some other EC2 instance in the same Availability Zone, mount the Attached Volume and peruse the file system in the usual way. Maybe your important data is still there!
Create the Volume from the Snapshot
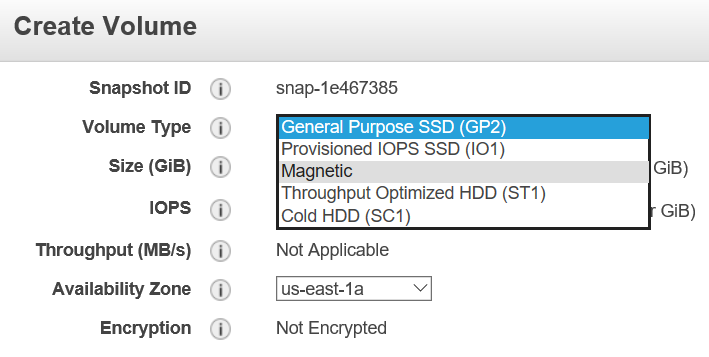
I will choose Magnetic because it is a bit cheaper… this is just an example. If I wish to have speed I would stay with SSD.
The Volume is created very quickly.
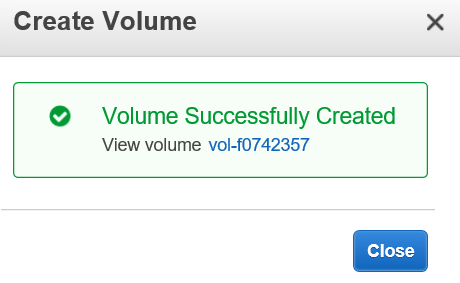
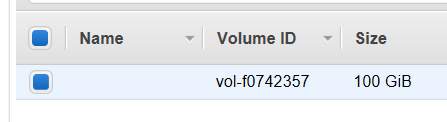
Here it is, now listed in the Volume table:
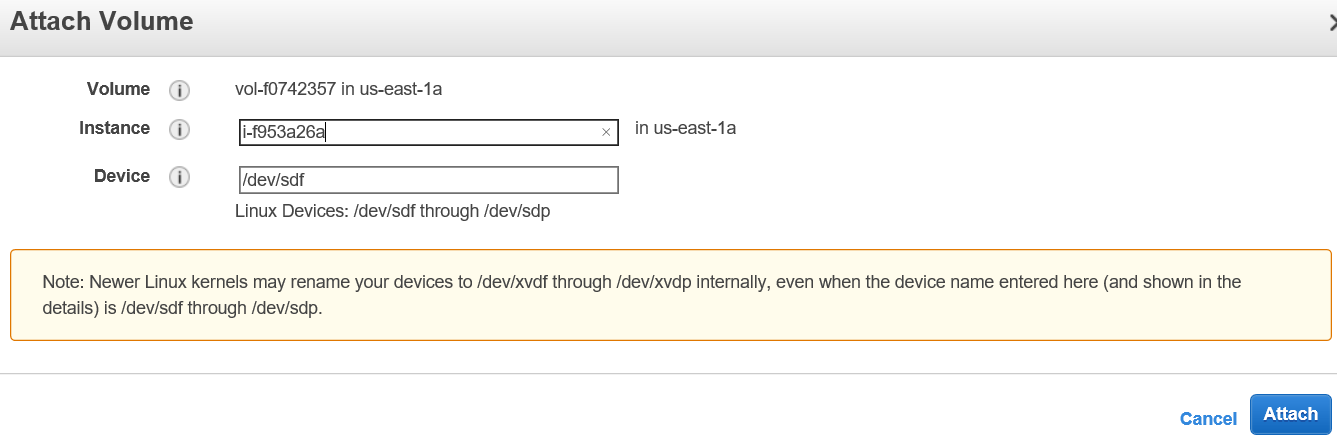
PRO TIP: When you create a Volume from a Snapshot make sure it is in the same Availabilty Zone (AZ) as the Instance that you intend to attach it to. Failing to do so is a waste of time: You can’t attach a Volume in Oregon to an EC2 in Virginia. In fact you can’t attach a Volume in Virginia 1-a to an EC2 in Virginia 1-b. Virginia is a Region, 1-a is the Availability Zone.
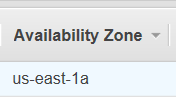
That’s where my restored Volume is. Oh look I have a machine there also; though it is Stopped: Let us Start it.
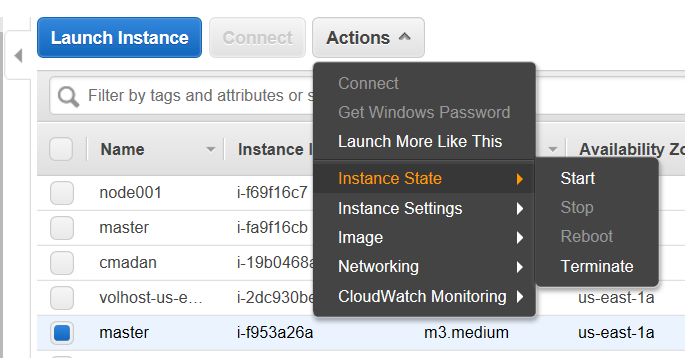
This finds a host, creates a VM, points to the associated storage all of this takes a few minutes but you can be impatient and see if you can Attach the restored Snapshot Volume whenever you like.
Mounting the Attached Volume
To check if there is an attached volume, log on (ssh) onto your EC2 instance. More information is here
First see if it is attached with:
>> lsblk

Disk /dev/xvdc: 10.7 GB, 10737418240 bytes
Then format (if you haven’t already):
>> sudo mkfs -t ext4 /dev/xvdc
Create dir where it will be mounted:
>>mkdir /data
Mount it:
>>sudo mount /dev/xvdc /data
Check if it has been mounted correctly with:
>>mount -l
/dev/xvdc on /data type ext4 (rw)
Next, you will want to edit the fstab configuration file to have it mount automatically on reboot. Get the disk UUID. For example, for /dev/xvdb,
$ sudo file -s /dev/xvdb

/dev/xvdb: Linux rev 1.0 ext4 filesystem data, UUID=07273928-caa9-4822-98b7-912e6eea4494 (needs journal recovery) (extents) (large files) (huge files)
Next, edit the fstab configuration file. You will want to change the label of the root disk (usually called cloudimg-rootfs)
>>sudo vim /etc/fstab
Modify to read for example:
UUID=4573eb39-57f3-439b-9a73-8aef508afd3f       /        ext4   defaults,discard        0 0
UUID=07273928-caa9-4822-98b7-912e6eea4494       /data   ext4    defaults,nofail         0 2
Note the the UUID for my /data drive is the same as the UUID we obtained the sudo file -s /dev/xvdb command above!
Check if there are errors in your /etc/fstab file:
sudo mount -a
That’s it. Make sure your read and write permissions are set accordingly using chmod.
What is the Snapshot ID?
Here is a screen capture of some volumes:
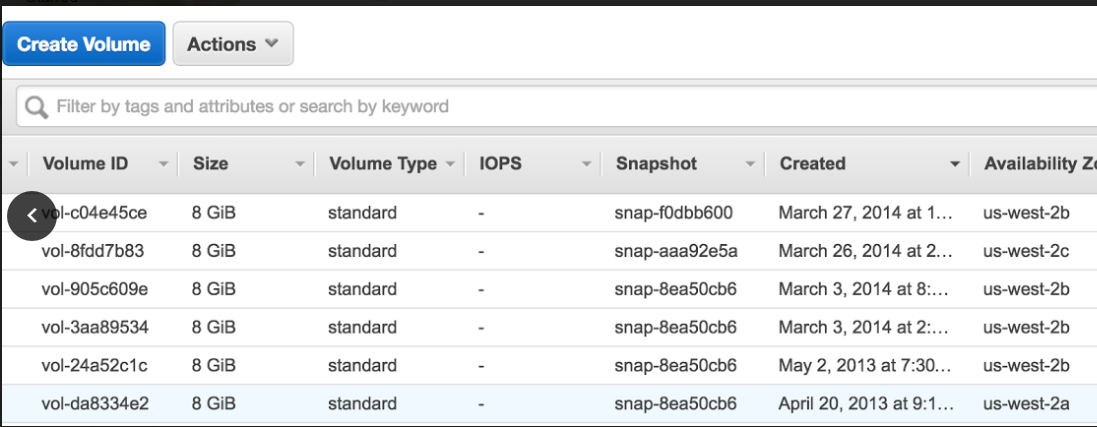
Each is attached to an EC2 instance. Notice these have a snapshot ID. This means that these volumes were created from a snapshot, for example from an AMI = Snapshot + instructions. It does not mean that this snapshot still exists; or that if it did exist it would reflect what is actually in the restored volume. That volume probably has changed. So to explore these volumes: Again we would ssh into the EC2 instance associated and go look at the file system.
In the case above, by the way, as noted earlier: These are all tell-tale Linux OS root volumes because the default on AWS Linux EC2 instances is 8GB.
Pro Tip: Returning to the snapshot table comment field (‘Created by… in our example above): This can have anything in there (User defined) when the snapshot is of an EBS without this AMI association business. ***
This concludes the overview of Snapshots and AMIs and the archaeological process of figuring out what is preserved on an artifact Snapshot.
Key Pairs
In the Resource summary table there is an entry for Key Pairs. Let’s cover what these are next. A Key Pair is both a public and a private key; and we will be primarily discussing the use of the private key file to authenticate into an AWS EC2 instance using the secure shell (ssh) protocol.
Start up an EC2 instance. You need an initial way of getting in via ssh. Rather than use a password let’s use Key Pair authentication. I get the private Key file; and it contains JUST a private key: A long string of characters. Let’s not publish this on Github.
When I authenticate using PuTTY I set it to use this private key. PuTTY uses the ‘.ppk’ version of the key but AWS only gives out a ‘.pem’ version of that file. No problem: There is a separate application called PuTTYGen that does the conversion. So procedurally:
- Generate the EC2 instance
- From the AWS Console: Get the key file associated.
- Install both PuTTY and PuTTYGen (both will install in a PuTTY package)
- Run PuTTYGen and convert the key file from .pem to .ppk format
- Run PuTTY and use the .ppk file to log in to the instance.
To ssh to this EC2 instance I will need to know what username to enter. This can vary from one EC2 instance type (OS) to another. For example on an AWS-styled Linux machine the user name is ec2-user. On an AWS EC2 Ubuntu instance the username is ubuntu.
Now I have logged in to the machine using ssh. I can sudo anything I want. Success.
How do I log in in the future? How do others log in? Three options:
- I can use the key that I have and/or give that key to someone else.
- I can generate a new key on that machine and share that key. This has nothing to do with AWS. I could do it with a script for example, using Linux commands.
- I can enable logging in by username and password.
Notice that ssh is a secure (encrypted) tunnel through which these keys are passing.
This security level is maintained as a separate effort by ssh / PuTTY. (PuTTY is the application and ssh is the cryptographic network protocol.)
Ssh, PuTTY, scp and WinSCP
Now that we have identified PuTTY as the ssh-using application let’s go a bit further. Ssh is also a Linux command for logging into another machine; so in a sense PuTTY is the Windows equivalent of the Linux ssh. Similarly there is a secure copy program in Linux called scp. The Windows analog is WinSCP.
More on Keys
Keys are actually generated in pairs: The public and private key pair are associated; and the public key can be openly shared. For more on this see this.
On AWS I can only generate one key pair per machine. The private key recognition machinery is injected into the instance when it launches the first time; and I can start multiple instances using that same key. If I create an AMI and use that to generate many EC2 instances: Again just one private key provides access to all of them. One key can map to many EC2 instances in the context of AWS.
Keys Versus S3 Access Sharing
Let’s take a moment to contrast Key-based access to an EC2 instance with the process of sharing files using S3 buckets. The latter is done using IAM permissions, specifically using a Bucket Policy.
Sharing between AWS accounts is straightforward. If my friend has an AWS account then I just set that up in the S3 bucket policy by referring to his account number. So he has to send me that.
Sharing with non-AWS-account holders is also easy and there are several options. If my collaborator has no AWS account I have three broad categories of approach: IAM User, Web Server and Signed URL.
IAM User method: I get an Access Key and a Secret Key. I do not think this is the same thing as a Key Pair but I could be proven wrong. I receive these two keys for example when I create a User. They reside in a single credential file. I click “Download Credentials” and there it is in ASCII. The file is in CSV format and includes a user name, an access key and a secret key (all strings).
There are three ways of getting to the S3 bucket now for that person.
- Third party tool: Cloudberry, Cyberduck, etcetera
- AWS command line interface (CLI)
- An API call
- Notice this does NOT involve the Web Console.
- They can only use the AWS Web Console if I generate a password for them using IAM.
- Notice this does NOT involve the Web Console.
Put a web server / web app in front of the S3 bucket. This pushes the problem down a level, so to speak.
- Generate a signed URL
- Gives access to one object during the time-to-live associated with that URL.
- This can be done on the CLI or in one of those applications (Cloudberry etc)
- Look for the button that says ‘Generate signed URL’
So now we have covered Key Pairs and differentiated Key Pair use from S3 access.
Mounting an EBS to your Instance
FTP Setup and EC2 Instance
Overview: Create a virtual machine, install the ftp server and setup user accounts.
Bonus: Bind your EC2 instance to an Elastic IP so you can reuse the same public IP even if your instance changes!
-
Sign up for a free AWS account here. Usage and free tier information available here.
-
This recipe from AWS is straightforward. Print it out and don’t skip a step. An EC2 (elastic compute cloud) is your virtual computing environment i.e. your virtual machine. This video by Microwave Sam expands on the EC2 setup.
-
Once your VM is ok you can securely tunnel via Mac Terminal, Linux ssh or Windows PuTTY.
-
You can set up an FTP server on your VM. Search stackoverflow for “setting up ftp server on amazon cloud”.
-
Test by connecting an FTP client to your FTP server. You may need to change directory permissions on the VM.
Elastic IPs
Stopping and re-starting EC2 instances can change the ip address. OVercome this using Elastic IP. You get a limited number of these with your account; and you can request more. See the AWS user guide (kilroy link needed).
Once you’ve associated the Elastic IP with a running instance, you can ssh into the VM with the Elastic IP but using the previous public key generated for the instance. Don’t forget to update the vsftpd.conf with your new Elastic IP address which is now your public address.
> sudo vi /etc/vsftpd/vsftpd.conf
pasv_address=<Elastic IP address>
> sudo /etc/init.d/vsftpd restart
Microsoft Azure let’s you choose your own public DNS hostname which reduces the need for this workaround.
DNS Hostnames
If you have your own registered domain, you can set your A-Record to point to the Elastic IP address of your instance. That gets rid of the unsightly public DNS that AWS assigns to you. Here’s the example for cloudmaven.org (our domain registrar is Namecheap.com):
(link was broken; image should be put in images/az and referenced directly)
An A-record points the hostname (here “compute”) to the AWS instance Elastic IP (here “52.41.144.22”). I can then ssh into my compute instance using ec2-user@compute.cloudmaven.org. You can also set up similarly an A record called ftp that points to the elastic IP of your ftp server instance to allow ftp access into say ftp.cloudmaven.org.