Introduction
This page describes three views of the Internet of Things (IOT) on the public cloud. Before enumerating them we make the claim that the story of IOT is really a cloud story… once you get your devices up and running. To put this another way: Deploy your devices, get the data flowing into the cloud, and then the fun begins.
Here we discuss
- Smart meter data from a University of Washington building
- AWS IoT buttons connected to the AWS Lambda service (through UW WiFi)
- Arduino devices connected to the AWS cloud IoT service
Lexicon
- IOT: Internet of Things, embedded devices from smart phones to Arduino constructions to FitBits
and beyond – limitless – that create an information framework in some environment.
- IOT emphasis is first placed on devices
- Here we are more interested here in a backing or supportive data system
- This system is implemented on the public cloud
- Diaspora: Informally the distribution / dispersion of IOT devices into some environment
- Devices locations may change over time; a common IOT theme
- CLI: Command Line Interface, here specifically the one for AWS
- The CLI exists in the abstract as a means of communicating with the cloud
- To use it: It must be installed on an EC2 instance
- To use it from off the cloud (e.g. from your laptop) it must also be installed there
- For IOT work we use the CLI to poll or query the supporting data system
- IDS: IOT Data System, an acronym of convenience
- Implies that we build devices, build the IDS, and then connect them together
- REST API Endpoint: A URL where http messages will be POSTed by the IOT device
- Shadow: An AWS cloud construct
- Behaves as a shadow / proxy / image / representation of an IOT device
- Persists on the cloud regardless of whether the IOT device is connected
- As such it acts as the “latest known state record” of the device
- MQTT: Message Queue Telemetry Transport, a lightweight publish-subscribe messaging protocol used on top of TCP/IP.
- MQTT topic: A message tag that enables a message stream to be sorted (by that tag)
Smart Meter Project
- UW buildings talk to an aggregator called Tritium Niagara
- This in turn is passing certain data from Gowan Hall along to a SQL Server database on AWS
- These data are available for query using proper connection credentials
UW ‘smart meters’ connect to an aggregator system called Tritium Niagara. Our objective is to provide fast access to these power consumption and other sensor/actuator data. We are specifically working a single building: Gowan Hall. The update rate is typically five to fifteen minutes with about 70 sensors.
On an AWS account we establish a small SQL Server database instance on the RDS (Relational Database Service). This is blocked from direct internet access by means of a bastion server. The results are updated via a data push originating from Niagara.
kilroy more details from implementation to grand scheme
kilroy need github version of the jupyter notebook
AWS IoT buttons
We follow this guide.
Arduino devices connected to the AWS cloud
Objective and Approach
The Arduino Maker community is quite large, active and supportive. The Arduino Yun model has both a typical microprocessor as well as a second ‘system on a chp’ processor running Linux with WiFi. The Yun is therefore supported by AWS via an IOT Endpoint. This means that the device can be registered on the AWS cloud. It ‘exists’ there as a virtual extension of itself. The physical device might generate signals or be interested in listening to other devices. The IOT endpoint is a routing destination where this communication takes place using the MPQQ communication protocol.
kilroy sidewalk ends here
The objective here is to establish a POC IOT implementation that connects a device located inside a University (UW Seattle) to the AWS cloud; with signals going to and fro. The approach is to obtain and configure such a device and document this initial success for further expansion, for example into a prototype IOT network as part of a research project.
Solution
- Purchase an Arduino Yun device; install the IDE
- Power up, establish WiFi connectivity
- Register the device with the University IT department using its Mac address
- Register the device at AWS by means of an IOT Endpoint service
- Develop and test code on the Yun to communicate with (report in) to its virtualization on AWS
- Document this process
Results
- We have successfully implemented Arduino Yun registration and data passing to an AWS IOT end point
- Further development will be supported out of our cloud research program at opportunity
Admonitions
- IOT devices are vulnerable to multiple failure modes
- Operational failure: Fragile, not ruggedized
- Malicious interference
- Spurious signals often assumed to be accurate
- To all three such ends we emphasize here on the backing data system: In the public cloud
Embedded device
Ping pong
Two Arduino Yun devices are powered up adjacent to one another. Each has a light sensor and a laser diode pointed at the other’s light sensor. State sequence:
- Yun 1 laser diode ON
- Yun 2 senses increased signal at light sensor
- Yun 2 transmit Sensor High to IDS (IOT Data System: In this case an AWS IOT Endpoint)
- IDS publishes Yun 2 Sensor High
- Yun 1 polls IDS, notices Yun 2 Sensor High state, in response turns laser diode OFF
- Yun 2 senses low signal at light sensor
- Yun 2 transmit Sensor Low to the IDS, turn laser diode ON
- IDS publishes Yun 1 Sensor Low
- Yun 1 senses increased signal at its light sensor
- Yun 1 transmit Sensor High to the IDS
- IDS publishes Yun 1 Sensor High
- Yun 2 polls IDS, notices Yun 1 Sensor High state, etcetera
Procedural
- Purchase at least 2 Arduino Yun boards (supported for IOT by AWS)
- Cost is around USD 60 circa 2016
- These devices have not one but two distinct processors
- The Arduino microcontroller ‘Atmega’ (technically ATmega32u4)
- A LINUX processor ‘Atheros’ (technically AR9331)
- Note that we are implicitly dealing with three complexities from the outset
- Programming an Arduino microcontroller
- Creating execution logic on a LINUX system
- Coordinating communication between the two
- Install the Arduino IDE on your laptop
- IDE = Integrated Development Environment
- In the work shown here the installation is on a PC running Windows 10
- The IDE connects with the Arduino Yun by means of a USB cable
- The Arduino can receive its operating power through this cable
- The Arduino will ultimately run autonomously off a separate power source
-
Install the AWS CLI on a laptop
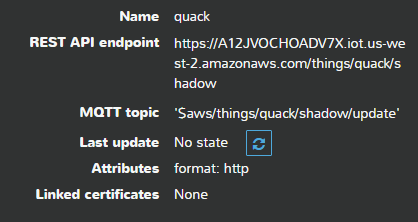
- Set up a REST API endpoint on AWS; our example is called ‘quack’
- Set up the Arduino Yun
- WARNINGS: Some procedures may not match reality; and we will call attention to them
- Example: Out of the box on WiFi the Yun comes up as ‘Linino-XXXXXX’ with password ‘doghunter’
- This is contrary to published information; and may be out of date as of this writing
- Upon updating the Atheros OS and connecting to local WiFi this changes…
- …becoming ‘Arduino-XXXXXXX’ with password ‘arduino’ as advertised
- Example: Out of the box on WiFi the Yun comes up as ‘Linino-XXXXXX’ with password ‘doghunter’
- Installing hardware and software
- Tutorial links
- Arduino Yun + USB cables ‘standard to micro’ connectors with full USB connectivity support
- WARNING: Many common USB cables do not support full connectivity and do not work.
- Laptop install:
- PuTTY: required on Windows (ssh on Linux)
- WinSCP: required on Windows to transfer files (scp on Linux)
- Arduino IDE: to program the Atmega
- The IDE is not used to program the Atheros, treated as a separate Linux system
- AWS IOT: Arduino SDK
- This is a library
- It permits the Atmega sketch to converse with the AWS IOT
- AWS CLI: Command Line Interface to AWS, on Windows runs from PowerShell
- Atheros: issue commands as root (we do not believe sudo is involved)
- WARNINGS: Some procedures may not match reality; and we will call attention to them
# opkg update
# opkg install distribute
# opkg install python-openssl
# opkg install openssh-sftp-server (enables sftp from PC to Atheros)