Cloud 101: Introduction to AWS, Azure and Google Cloud
Introduction to the AWS console & provisioning an EC2 instance
Overview
Teaching: 0 min Exercises: 30 minQuestions
How do I build a virtual machine in AWS?
How do I use my virtual machine to transfer data to an S3 bucket
Objectives
Learn to launch an AWS EC2 instance
Learn to create an AWS S3 storage bucket
Learn how to use the AWS CLI to transfer data from your AWS EC2 instance to the S3 storage bucket
Prerequisites
A 2-factor authentication app (e.g. Authy ) Terminal or bash for Windows
Create an IAM user
For security, you should not log in to your account using root credentials. Anything that you need to do with your AWS services can be achieved by creating an Administrator role through IAM. You only need root access for managing your account plans (upgrades or closing your account)
There are two parts to ensuring security of your account. One is enabling Multi-Factor Authentication to log on as root, and installing yourself as the first All-Supreme Being Administrator.
More information is available here
Launch an AWS EC2 Instance
*This tutorial was adapted from the AWS EC2 Instance Starter Guide and https://cloudmaven.github.io/documentation/aws_ec2.html
Step 1: Launch an Instance
You can launch a Linux instance using the AWS Management Console as described in the following procedure. This tutorial is intended to help you launch your first instance quickly, so it doesn’t cover all possible options. For more information about the advanced options, see Launching an Instance.
To launch an instance
Open the Amazon EC2 console at https://console.aws.amazon.com/ec2/. Participants on our accounts should use: https://uwcloudczar.signin.aws.amazon.com/console and log on with the given username and password. You will be prompted to change your password.
From the console dashboard, choose Launch Instance.
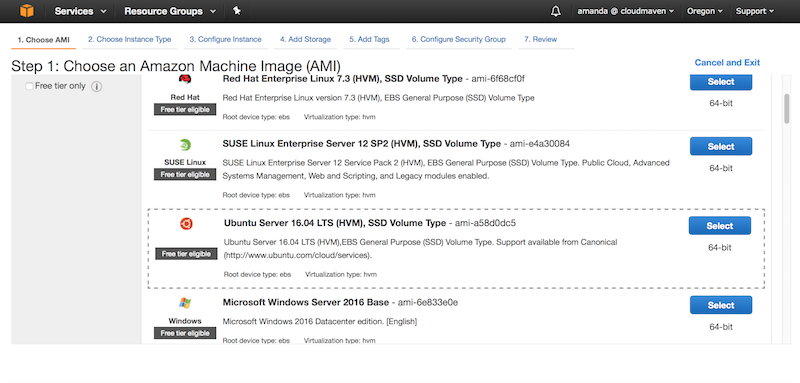
The Choose an Amazon Machine Image (AMI) page displays a list of basic configurations, called Amazon Machine Images (AMIs), that serve as templates for your instance. We will be setting up an Ubuntu 16.04 virtual machine.
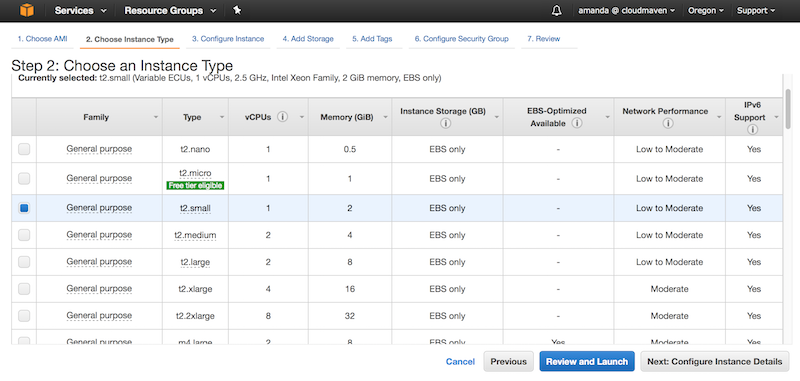
On the Choose an Instance Type page, you can select the hardware configuration of your instance. Here, we will select the t2.small type
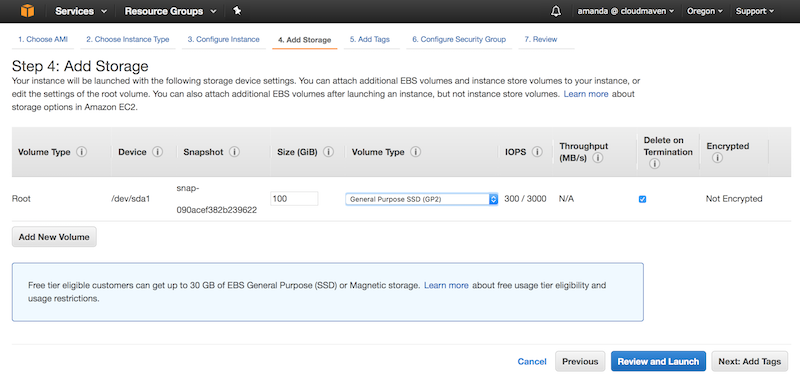
You can also add storage to your virtual machine. We will change the root directory to be 25GB, to account for installation of some packages.
We won’t be covering this in the workshop, but the directions on how to mount the additional storage (other than root) to your virtual machine is here.
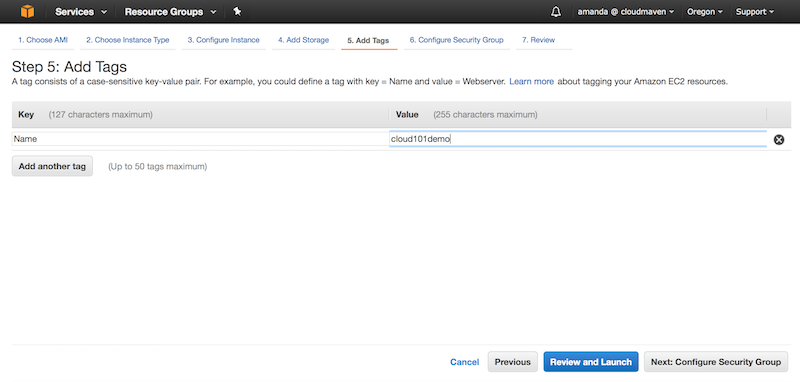
You can add Tags to your EC2 to help with identify your resource for things like billing etc. For example, you can specify Machine Name, Owner, Group, etc. More info here.
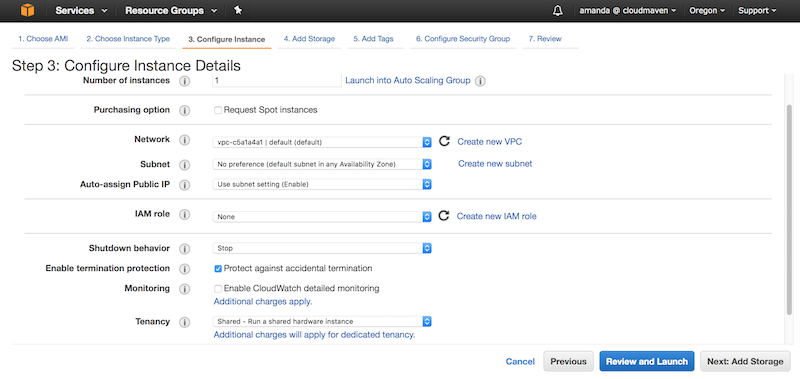
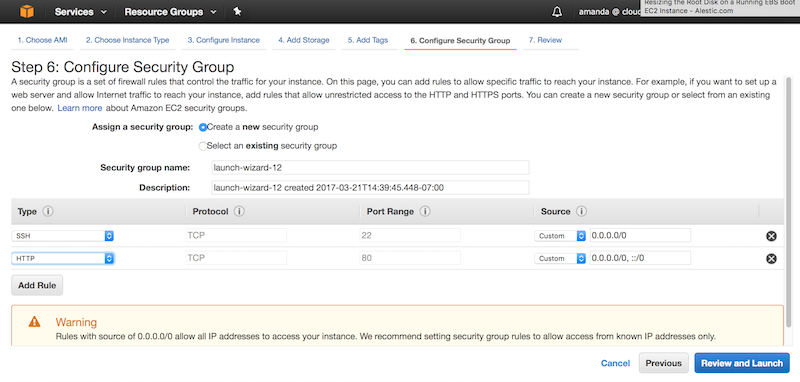
To avoid creating multiple security groups, we will all select the Cloud101 Security Group which will have Port 22 (ssh) and Port 80 (HTTP) open.
On the Review Instance Launch page, choose Launch.
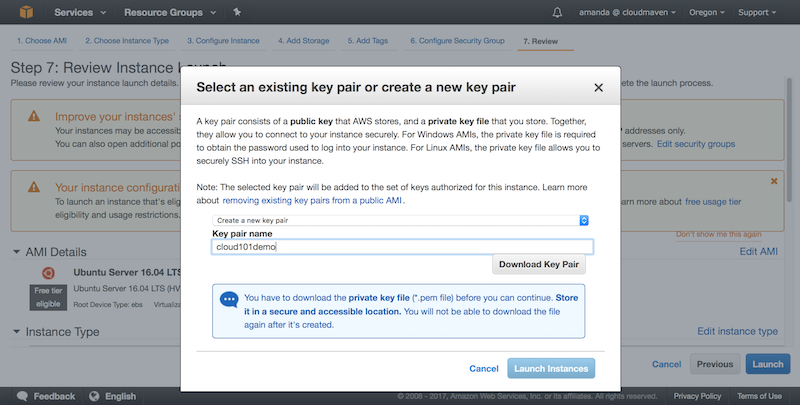
When prompted for a key pair, select “Create New Key Pair”, enter a name for the key pair, and then choose Download Key Pair.
This is the only chance for you to save the private key file, so be sure to download it. Save the private key file in a safe place. You’ll need to provide the name of your key pair when you launch an instance and the corresponding private key each time you connect to the instance.
Caution Don’t select the Proceed without a key pair option. If you launch your instance without a key pair, then you can’t connect to it. When you are ready, select the acknowledgement check box, and then choose Launch Instances.
A confirmation page lets you know that your instance is launching. Choose View Instances to close the confirmation page and return to the console.
On the Instances screen, you can view the status of the launch. It takes a short time for an instance to launch. When you launch an instance, its initial state is pending. After the instance starts, its state changes to running and it receives a public DNS name. (If the Public DNS (IPv4) column is hidden, choose the Show/Hide icon in the top right corner of the page and then select Public DNS (IPv4).)
It can take a few minutes for the instance to be ready so that you can connect to it. Check that your instance has passed its status checks; you can view this information in the Status Checks column.
Create a s3 storage bucket
We will now ssh into the virtual machine, install miniconda and install the AWS CLI.
The two things you need are your private key and your instance DNS or IP address.
Open your Terminal or Bash Shell. Go to the location of where you downloaded your private key. We will need to change the permissions for the private key.
$ cd ~/Downloads/keys #This is the directory I save my keys in
$ sudo chmod 400 privatekey.pem
$ ssh -i "privatekey.pem" ubuntu@ec2-35-160-75-232.us-west-2.compute.amazonaws.com
Once you’ve ssh-ed into your virtual machine, we will download and install miniconda.
$ sudo apt update
$ wget 'https://repo.continuum.io/miniconda/Miniconda3-latest-Linux-x86_64.sh'
$ bash Miniconda3-latest-Linux-x86_64.sh
$ source ~/.bashrc
Go through the prompts. Next we will install the AWS-CLI
$ pip install --upgrade --user awscli
Now we can configure the CLI. When prompted, enter your Access Key ID and Secret Access Key, Default region name and Default output format (json, text etc.). You can go ahead and just press “Enter” for the latter two.
$ aws configure
Next, we will list all the buckets, create a bucket, download a file from an external s3 bucket and then upload it to your own s3 bucket.
$ aws s3 ls #list buckets
$ aws s3 mb s3://<bucket-name>  #make bucket
$ aws s3 ls s3://<bucket-name> #list bucket contents
$ aws s3 cp s3://cloud101demo/Mean_Apr_ET.geojson . #download a file from a shared bucket
$ aws s3 sync s3://<bucket-name> s3://cloud101demo --acl public-read #sync your bucket with the cloud101 bucket and allow public read access
More info here: http://docs.aws.amazon.com/cli/latest/userguide/using-s3-commands.html
Key Points
We want to build a virtual machine on the AWS cloud and transfer some data into storage.
We will learn about the different available storage mechanisms on AWS