Overview
Teaching: 0 min Exercises: 25 minQuestions
What are the moving parts of cfncluster?
Objectives
Use a Fourier transform as a non-trivial basis for running a cluster compute task
Prerequisites
- Log in to your properly sanitized AWS account via the console
- Refer: Cloudmaven and its EC2 page
- Place your IAM User credentials (public and private ID strings) in a secure location (never GitHub!)
cfncluster in diagrams
Cfncluster depends upon three types of machine: Launcher, Master and one or more Workers. The purpose of cfncluster is to provide you with a robust cluster computing environment that manages resources without a great deal of effort on your part. This leads to the first of our triage questions intended to help you develop your computer environment.
Triage: Reduce your cost by introducing some risk?
On the AWS Spot market you place a bid price for instances. Suppose you want your Worker nodes to be c4.8xlarge EC2 instances that cost $1.50 per hour. You notice the Spot market rate is $0.40 so you bid $0.50 as your compute task begins. Now as long as the Spot market price is stable you will be able to keep any instances your are allotted. You can read more on the Spot market here. The risk is when the price goes up: You pay whatever the market rate is per hour (not your bid amount) but if the market rate exceeds your bid you will be given two minutes notice and your instances will then go away.
Review the three machine types
The Launcher is as the name implies just about getting things set up. It can as easily be your laptop but for the sake of ‘everything in the cloud’ we set it up in this tutorial as a small EC2 instance.
The Master node is just what it sounds like: Where the cluster central intelligence resides. The Master initiates, manages, and closes out various jobs and Workers. jobs are managed by means of a queue and some related AWS services (Auto Scale Group, Simple Queue Service etc; see below).
Workers are EC2 instances that do the actual computing. Each Worker must have its custom software pre-installed so that time is not wasted. It must also have fast access to any needed data. We will keep an eye on these two points through the following process.
Let’s start with the classic How It Works diagram provided by AWS. We talk through the various components before walking through an example.
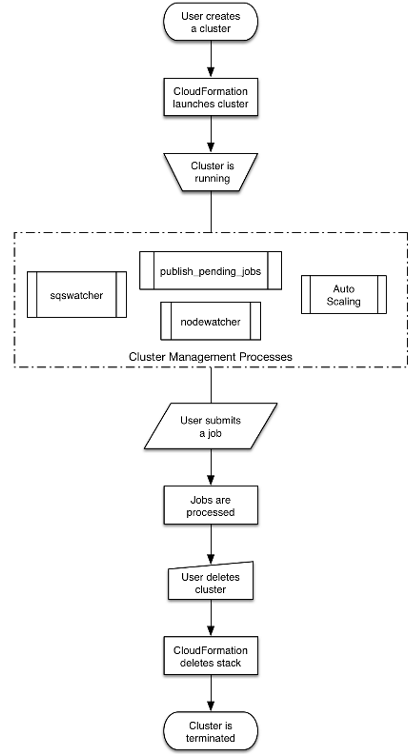
The guts of this thing are the four sub-boxes in Cluster Management Process; so if we understand how they function together we will be in good shape.
We begin with a cronjob that runs once every minute on your Master instance. A cronjob is a task that executes periodically on a Linux machine as part of the cron scheduler execution process. We note that Linux machines also run daemon processes which are always active but generally quiet/passive, waiting for some condition on the computer to trigger their active behavior.
You would think that a scheduler like cron all by itself could do everything we show here; and like most solution ideas in Linux it is possible but it would require considerable manual effort. Rather we use cfncluster working with a different scheduler called SGE to take advantage of an existing solution. This solution includes a lot of detail management that has arisen as cluster computing has evolved. One SGE advocate says ‘powerful, flexible, scalable, useful’. But note that other schedulers are available: SLURM, Toruqe, OpenLava, … so you have options.
Ok, so the cronjob of interest is publish_pending_jobs, expanded here:
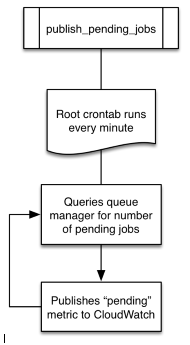
Notice that this queries something called a queue manager so let’s define that next. We first expand on the scheduler we mentioned above: Sun Grid Engine or SGE. (A circa-2009 for dummies tutorial can be found here.)
The SGE Master node runs a qmaster daemon. The SGE Worker nodes run an execution daemon. The qmaster daemon waits for you the User to submit a job. This job then goes through a three state sequence: pending (sitting on the job queue), running, and then done. So we see that the queue manager is actually the SGE qmaster daemon.
How do you submit a job? In our example we will use the qsub command (which is short for queue submit of course):
qsub -V -b y -cwd /home/ec2-user/fourier 37 19
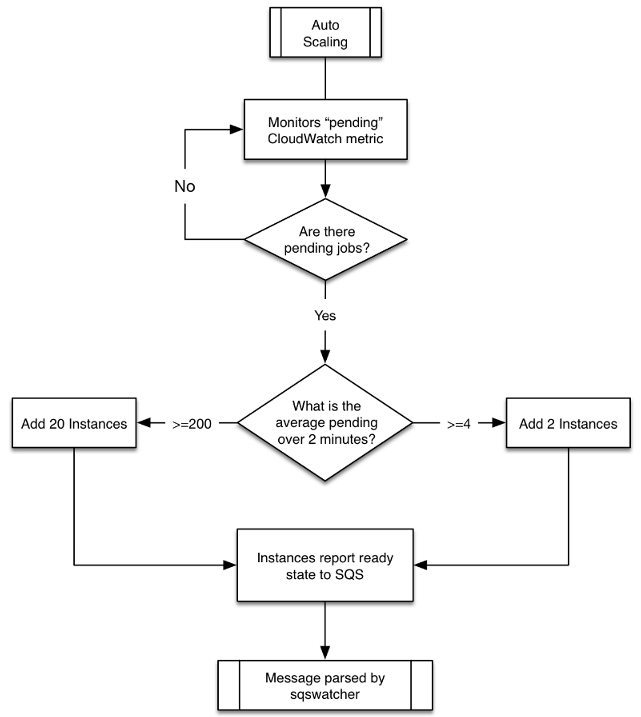
Auto Scaling Group and Nodewatcher Diagrams
Clusters deployed within CfnCluster use the configure file to determine:
- initial_queue_size: Initial size of the ComputeFleet Auto Scaling Group (ASG)
- max_queue_size: Maximum size of the ComputeFleet ASG.
Two CloudWatch alarms are created. They monitor a custom Amazon CloudWatch metric that is published by the Master node of the cluster. This metric is called pending. These CloudWatch alarms call ScaleUp policies associated with the ComputeFleet ASG. This is what handles the automatic addition of compute nodes when there are pending tasks in the cluster: Nodes are added until the alarms stop or the max_queue_size is reached. Auto Scaling also has a Cloudwatch alarm to remove instances that are no longer needed; hence there is a corresponding ScaleDown policy.
Each Worker instance in the ComputeFleet ASG runs a process called nodewatcher. This process monitors the instance and if idle AND close to the end of the current hour the Worker is removed from the ComputeFleet ASG using an API call. Again the overall concept here is that the cluster scales itself back as long as it has adequate capacity for the current perceived work load and as long as it is at or above its configuration minimum. To this end there is a third boolean parameter maintain_initial_queue_size that can be set to true in the config file.
Here are the corresponding diagrams:
Notice that Simple Queue Service (SQS) is an important part of this flowchart. It is discussed further below as the fourth of our four daemon processes in CfnCluster. Before turning to SQS though let us dispense with the Nodewatcher as follows.
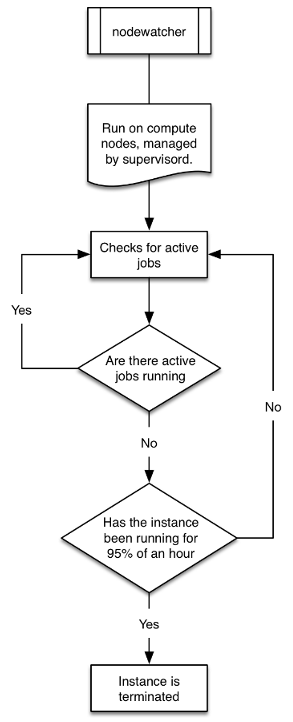
This is a straightforward IF AND statement that causes Workers to be terminated.
Simple Queue Service (SQS)
SQS is used in cfncluster as the online/offline messaging system. The sqswatcher daemon running on the CfnCluster Master monitors for SQS messages emitted produced by Auto Scaling: When an instance comes online it submits “instance ready” to SQS which is picked up by sqs_watcher running on the Master. These messages are used to notify the queue manager (in our case the SGE qmaster daemon) that new instances are online. The reverse is also true: When instances are terminated the SQS is used to notify the Mater that they are no longer available.
Walkthrough
Key vocabulary
- PIT: Project Identifier Tag, a unique string you designate like ‘himat’
- queue: A stack of jobs managed by a scheduler (in our example SGE)
- Master: A VM that manages the job queue
- Worker: A VM charged that executes jobs
- Scheduler: Software that manages/executes jobs on a queue
- Includes SLURM, Torque, OpenLava and SGE
- qsub: (Linux) submit a job to a processing queue
- qstat: (Linux) get queue status
- qdel: (Linux) delete a job from the queue
- host: List Worker nodes
- IAM User Keys: There are two: The AWS Access Key ID and the AWS Secret Access Key ID
These steps depend upon some pre-configuration, already done prior to the class:
- We created a Virtual Private Cloud with a public subnet for this exercise.
- We created an associated Internet Gateway and a Security Group.
- The Security Group permits ssh in from any location on the internet
- In passing this is not best practice because your work is visible from anywhere.
In what follows you will want to have a Project Identifer Tag or PIT handy. This is just a short ID string that you will use to tag everything you create. Mine PIT = ‘kilroy’. Herein I use PIT or kilroy interchangeably.
We will…
- Start up a Launcher EC2 on AWS
- Log in to this machine as ‘ec2-user’ using ssh and update it (standard practice)
- Install cfncluster and create a cluster on AWS
- On the AWS console watch our progress on the CloudFormation service
- Once a Master is available: Log in and configure it to execute some task
- Use a shell script on the Master to fill up the job queue with tasks
- Let SGE “notice” new instances and give them jobs as they become available
Some of the key terms involved:
- Auto Scale Group (ASG)
- Cloud Formation service
- Cloud Watch service
- Simple Notification Service
- EC2 instance: Launcher with cfncluster installed
- cfncluster creates a cluster that includes…
- An EC2 Master instance
- Recognizes Worker EC2 instances as they are added to the resource pool
- Has some memory
- Includes task software
- Shell script to launch multiple jobs to the SGE processing queue
- An EC2 Master instance
Create an EC2 instance cfncluster Launcher
- Refer to the EC2 page here
- Ensure you have your region (upper right of console) set to one of the following:
- California is us-west-1 and is where this test was run
- ap-northeast-1
- ap-northeast-2
- ap-south-1
- ap-southeast-1
- ap-southeast-2
- eu-central-1
- eu-west-1
- sa-east-1
- us-east-1
- us-west-1
- us-west-2 (This is Oregon but it will not work on the cloudczar account: EIPs are all used up)
- California is us-west-1 and is where this test was run
- Click on the Launch EC2 Instance button
- Choose the Amazon Linux AMI
- This has AWS tools already installed; but we will update and install cfncluster
- Choose a small and cheap instance type, the default T2.micro.
- Do not click Review and Launch; we want to add some details
- Click Next: Configure Instance Details
- Choose the class VPC and subnet ‘cloud101’
- Enable (check) Cloud Watch
- Choose ‘shared tenancy’
- This EC2 Launcher will be our starting point
- Click through Add Storage, Add Tags, Configure Security Group
- Here click on Select an Existing Security Group
- Choose the cloud101 security group
- Now click Review and Launch
- Click through Add Storage, Add Tags, Configure Security Group
- Click Launch and notice a key pair box pops up
- If you have already created a keypair for this class:
- Select Use an existing keypair and select that keypair
- Else if you have not:
- Select Create a new key pair and give it a unique name; and download it
- The file extension will be .ppm.
- You use PuTTYGen to convert this to .ppk if you are using Windows
- Select Create a new key pair and give it a unique name; and download it
- Click on Launch Instances and monitor the progress of your machine (2 minutes)
- If you have already created a keypair for this class:
- In the EC2 monitor on the console notice all the instances in the table
- Sort by Key Name, find your Key, and re-name your machine
- For example kilroy_Launcher
- Sort by Key Name, find your Key, and re-name your machine
- Your instance is ready when the table gives it a green dot and there is an ip address present
- Use ssh or PuTTY to log in to your instance as ec2-user@ip-address
- Get the ip address from the same table
- We place everything in a single Region/AZ/etceter
- Region = us-west-2 (Oregon)
- AZ = Zone C
- VPC = Virtual Private Cloud cloud101_vpc
- Subnet = cloud101_public_subnet
- Internet Gateway = a mechanism for two way traffic between the internet and the VPC interior
- Route Table entries = where VPC-internal ip addresses are routed
- Security Group = cloud101_securitygroup (ssh allowed from anywhere: ‘hi risk’)
Log in and configure the Launcher
You now log in to your cfncluster Launcher using ssh (or PuTTY on Windows) where your login name is ‘ec2-user’. You do not enter a password as you are using your .pem (or .ppk) file to authenticate.
Once logged in you will update your machine, install the cfncluster tools, configure cfncluster and create a new named cluster. This in turn will lead to the last steps to run a large-scale compute task.
On your EC2 Launcher:
% sudo yum update -y
% sudo pip install --upgrade cfncluster
% cfncluster
We run configure as a sub-command of the cfncluster command. This creates a configuration file that governs the behavior of our subsequent cluster computing using this utility. Hence cfncluster configure produces a config file within the .cfncluster directory in your home directory. (Use ‘ls -al’ to see that this exists.) A good way to get the configure steps correct is to follow the details at a web page like this one.
You will need to have a copy-able view of your IAM User credentials file available for these config steps:
% cfncluster configure

<here is a guide to the answers to the ensuing dialog>

Cluster Template [default]: <hit enter>
AWS Access Key ID []: <cut and paste your Access Key Id string from your credentials file>
AWS Secret Access Key ID []: <cut and paste your Secret Access Key>
AWS Region ID []: <type in us-west-2 which is Oregon>
VPC Name [public]: <hit enter>
Key Name []: <enter your keypair name as in 'kilroy101'>
VPC ID []: <enter the cloud101_vpc ID which is 'vpc-34014a53'>
Master Subnet ID []: <enter the only choice, subnet-90382ac8>
At this point you can re-run cfncluster configure and see it allows you to default-enter your way through the same process or change values if you like. You can also examine the two files in the .cfncluster directory: config and cfncluster-cli.log.
The config file contents are interesting and include only a fraction of the complete config vocabulary. For a listing of this vocabulary see the Configuration page published by AWS.
Finally we are ready to create the cfncluster. This will spin up an EC2 instance as our Master node also referred to as the head node. It will be listed by default as Name = Master in the EC2 table.
% cfncluster create n101
n101 is simply the name of the cluster. Creation takes several minutes will launch the Master node as noted. By default this will be a small EC2 instance (T2).
On the AWS console in your browser you can monitor your progress using the CloudFormation service.
Once the Master is up: Log in using the same procedure as for the Launcher and do an update
sudo yum update -y
Running a cluster task
You have a running cfncluster including a Master node where you are logged in. Here you configure your processing task. Once that is done you can set up a script file that submits a number of processes to the processing queue using the Linux command qsub. These will be placed on a queue that we can view using the command qstat.
Let’s begin by writing a slightly non-trivial C program and compiling that using the gcc compiler. This program performs part of a Fourier transform on a simple vector. cfncluster will create Compute instances to execute multiple versions of this program out of the job queue.
#include <stdio.h>
#include <stdlib.h>
#include <math.h>
#include <unistd.h>

#define MAX_N 32768

void main(int argc, char **argv)
{
    sleep(210); // sleep for 210 seconds to artificially extend the process duration
    if (argc < 3) { printf("\nfourier N i: i'th coeff of an N-element signal\n\n\n"); exit(0); }
    int n, N = atoi(argv[1]), i = atoi(argv[2]);
    if (N < 0 || N > MAX_N || i < 0 || i >= N) { exit(0); }

    double s[MAX_N], ar = 0.0, ai = 0.0, pi = acos(-1.0), dN = (double)N, di = (double)i;
    double dShft = (double)(N/2), dScl = (2.0*pi*5.0)/dShft, dGScl = 2.0/dShft, x, xg, exp_arg;

    for (n = 0; n < N; n++) {                     // signal generator
        x = ((double)n - dShft) * dScl;    // x is on [-5 * 2pi, 5 * 2pi]
        xg = ((double)n - dShft) * dGScl;  // ... also to a number on [-2, 2]
        s[n] = exp(-xg*xg)*sin(x);                             // ... and compile their product into the signal vector s[]
    }
    for (n = 0; n < N; n++) {                 // FT coefficient
        exp_arg = -2.0*pi*((double)n/dN)*di;  //   argument of the exponential
        ar += s[n]*cos(exp_arg);              //   accumulate
        ai += s[n]*sin(exp_arg);              //      "
    }
    printf ("\ncoefficient %d = (%lf, %lf).\n\n\n", i, ar, ai);
    exit(0);
}
Compile this program:
gcc -o fourier fourier.c -lm
The executable resides in the same location, by default /home/ec2-user.
Now we better save this image of the Master so that our Workers (Compute nodes) will know how to run fourier without compiling it. The good news is that the Compute nodes are built as images of the Master node so they will already know how to run fourier.
Here is a script that submits multiple fourier jobs to the job queue; I named it ‘go.sh’:
qsub -V -b y -cwd /home/ec2-user/fourier 37 0
qsub -V -b y -cwd /home/ec2-user/fourier 37 1
qsub -V -b y -cwd /home/ec2-user/fourier 37 2
qsub -V -b y -cwd /home/ec2-user/fourier 37 3
qsub -V -b y -cwd /home/ec2-user/fourier 37 4
qsub -V -b y -cwd /home/ec2-user/fourier 37 5
qsub -V -b y -cwd /home/ec2-user/fourier 37 6
qsub -V -b y -cwd /home/ec2-user/fourier 37 7
qsub -V -b y -cwd /home/ec2-user/fourier 37 8
qsub -V -b y -cwd /home/ec2-user/fourier 37 9
qsub -V -b y -cwd /home/ec2-user/fourier 37 10
qsub -V -b y -cwd /home/ec2-user/fourier 37 11
qsub -V -b y -cwd /home/ec2-user/fourier 37 12
qsub -V -b y -cwd /home/ec2-user/fourier 37 13
qsub -V -b y -cwd /home/ec2-user/fourier 37 14
qsub -V -b y -cwd /home/ec2-user/fourier 37 15
qsub -V -b y -cwd /home/ec2-user/fourier 37 16
qsub -V -b y -cwd /home/ec2-user/fourier 37 17
qsub -V -b y -cwd /home/ec2-user/fourier 37 18
qsub -V -b y -cwd /home/ec2-user/fourier 37 19
qsub -V -b y -cwd /home/ec2-user/fourier 37 20
qsub -V -b y -cwd /home/ec2-user/fourier 37 21
qsub -V -b y -cwd /home/ec2-user/fourier 37 22
qsub -V -b y -cwd /home/ec2-user/fourier 37 23
qsub -V -b y -cwd /home/ec2-user/fourier 37 24
qsub -V -b y -cwd /home/ec2-user/fourier 37 25
qsub -V -b y -cwd /home/ec2-user/fourier 37 26
qsub -V -b y -cwd /home/ec2-user/fourier 37 27
qsub -V -b y -cwd /home/ec2-user/fourier 37 28
qsub -V -b y -cwd /home/ec2-user/fourier 37 29
qsub -V -b y -cwd /home/ec2-user/fourier 37 30
qsub -V -b y -cwd /home/ec2-user/fourier 37 31
qsub -V -b y -cwd /home/ec2-user/fourier 37 32
qsub -V -b y -cwd /home/ec2-user/fourier 37 33
qsub -V -b y -cwd /home/ec2-user/fourier 37 34
qsub -V -b y -cwd /home/ec2-user/fourier 37 35
qsub -V -b y -cwd /home/ec2-user/fourier 37 36
Monitoring the process
Start the jobs (place them on the queue) on the Master node by issuing this command:
% source go.sh
Notice that ‘qhost’ produces an empty listing at the outset: Just the ‘global’ process (Master)
% qhost

HOSTNAME                          ARCH            NCPU NSOC NCOR NTHR   LOAD   MEMTOT  etcetera
------------------------------------------------------------------------------------------------
global                            -                  -    -    -    -      -        -
After the queue has run for a few minutes this qhost command should expand, as in:
% qhost

HOSTNAME                ARCH         NCPU NSOC NCOR NTHR  LOAD  MEMTOT  MEMUSE  SWAPTO  SWAPUS
----------------------------------------------------------------------------------------------
global                  -               -    -    -    -     -       -       -       -       -
ip-172-31-13-176        lx-amd64        1    1    1    1  0.01  995.4M  137.1M     0.0     0.0
ip-172-31-3-231         lx-amd64        1    1    1    1  0.04  995.4M  135.9M     0.0     0.0
ip-172-31-6-55          lx-amd64        1    1    1    1  0.01  995.4M  136.3M     0.0     0.0
The qstat command will provide a view of the queue:
% qstat
job-ID  prior   name       user         state submit/start at     queue                          slots ja-task-ID
-----------------------------------------------------------------------------------------------------------------
     82 0.55500 fourier    ec2-user     qw    04/04/2017 18:53:53                                    1
     83 0.55500 fourier    ec2-user     qw    04/04/2017 18:53:53                                    1
     84 0.55500 fourier    ec2-user     qw    04/04/2017 18:53:53                                    1
     85 0.55500 fourier    ec2-user     qw    04/04/2017 18:53:53                                    1
     86 0.55500 fourier    ec2-user     qw    04/04/2017 18:53:53                                    1
     87 0.55500 fourier    ec2-user     qw    04/04/2017 18:53:53                                    1
     88 0.55500 fourier    ec2-user     qw    04/04/2017 18:53:53                                    1
     89 0.55500 fourier    ec2-user     qw    04/04/2017 18:53:53                                    1
     90 0.55500 fourier    ec2-user     qw    04/04/2017 18:53:53                                    1
     91 0.55500 fourier    ec2-user     qw    04/04/2017 18:53:53                                    1
     92 0.55500 fourier    ec2-user     qw    04/04/2017 18:53:53                                    1
     93 0.55500 fourier    ec2-user     qw    04/04/2017 18:53:53                                    1
     94 0.55500 fourier    ec2-user     qw    04/04/2017 18:53:53                                    1
     95 0.55500 fourier    ec2-user     qw    04/04/2017 18:53:53                                    1
     .
     .
     .
     (and so on)
     .
     .
This queue listing will gradually get shorter as the tasks complete. As they complete they will write both standard output and standard error files into the /home/ec2-user directory. The standard output is print statement in the C program giving the Fourier coefficient value.
As an alternative ‘hello world’ approach to running cfncluster tasks you can edit a simple bash script file ‘hello.sh’ to read as follows:
#!/bin/bash
sleep 4
echo "hello world shout out from $(hostname)"
Make this script executable and submit it to the queue
% chmod a+x hello.sh
% qsub hello.sh
All of these example jobs run quickly (in minutes). When the script runs to completion qstat will again show an empty queue. The Compute (Worker) node will stay available for the balance of an hour since that is the billing time unit. I paid for it so I will hang on to it. It then evaporates back into the instance pool if it is not doing anything.
As these tasks run: Where is the output going? We have a shared filesystem and the Workers are writing to the home directory on the Master node.
Reviewing Launcher and cfncluster config
To connect this back to the Launcher: The cluster behavior is controlled by the cfncluster configure process which is described extensively in the CfnCluster config documentation. The directory on Launcher is where the configuration file resides is .cfncluster where we find two files: config and cfncluster-cli.log. The latter is the log file produced by prior cluster activity.
Notice that the Launcher has nothing whatever to do with the cluster compute task. It just builds the cluster entity; and we have to further configure that cluster to do the compute task.
Here is a .cfncluster/config file with an Elastic Block Storage (EBS) element of interest. Recall this file sits on the Launcher instance.
[aws]
aws_region_name = us-west-2

[cluster default]
vpc_settings = public
key_name = MPIPlay
ebs_settings = helloebs
shared_dir = /hello
ec2_iam_role = hello_world
initial_queue_size = 5
max_queue_size = 5

[vpc public]
master_subnet_id = subnet-37513940
vpc_id = vpc-a60a4ec3

[global]
update_check = true
sanity_check = true
cluster_template = default

[ebs helloebs]
ebs_snapshot_id = snap-f67581a4
This opens up the prospect of attaching some fast-access memory to each Compute instance as it comes online. This and many other details make cloud computing a mix of Wild West, art and computational results.
Key Points
Each cloud has its approach to cluster computing and cfncluster is a common example.